Setting up my own deep learning rig
Personal Note
Currently I am pursuing a online masters in computer science from Georgia Tech. Part of the coursework (that I intend to take) such as Deep Learning and Reinforcement Learning recommends a CUDA compatible GPU. In addition, based on my personal experience, the downside of using cloud technologies is that it can be a hassle to start/shut down instances (or if you forgot to!), which introduces a barrier when trying simple experiments. Furthermore, colab recently switched to a credits model instead of a subscription model.
This, combined with the recent surge of interest in generative AI, made me decide to invest in my own deep learning rig. In addition I thought it would be cool and educational about maintaining my own “private” server.
I decided to mimic my workplace setup, which is a remote desktop called Google’s Cloudtop with Goobuntu installed, and later switched over to gLinux. For developmental work, employees would ssh to their remote desktop ![]() . This is quite similar to how you spin up an EC2 or GCE instance.
. This is quite similar to how you spin up an EC2 or GCE instance.
Dualboot ubuntu
This post highlights the main reasons why I decided to use dualboot, I tried WSL2 but found the experience subpar (which is partly motivated by my workplace design). Another huge advantage of dual boot is the ability to add multiple users (each with a new environment) with it’s own installations.
I bought my PC from aftershock with Windows 11 pro. I mainly got windows for edge cases (or insurance?) in the event that ubuntu is not compatiable with certain software required for my masters. Also, as recommended by the ubuntu website, windows should be installed first.
This guide is the one I followed to install dual boot ubuntu. I download the ubuntu desktop version instead of the server function, just incase I ever need the UI.
Tips
- You need to prepare a thumbdrive to function as an ISO image.
- I set my ubuntu to be
- Default OS
- Login automatically.
This is so that I can place my desktop anywhere in the house, and I just need to turn the power on. For heavy debugging tasks I will connect it to a monitor
. For shutting down or rebooting, it can be done with
sudo rebootandsudo shutdown now.
Configuring users
These are the commands I found useful when configuring users / deleting users.
- Add user
1

  sudo adduser <username>
- Add user to sudoers group (Giving new users admin/root access):
- Online Guide on how to addd sudoers in ubuntu
1

usermod -aG sudo <username>
- Delete user
- askubuntu.com - How to delete a user & its home folder safetly
1
2
3

sudo userdel username
# Or to delete the home directory as well
sudo deluser --remove-home user
Configuring ssh
To setup your ubuntu desktop to allow ssh is incredibily easy:
1
2

sudo apt update && sudo apt install build-essential
sudo apt install openssh-server
Verify that ssh has been installed correctly:
1

sudo systemctl status ssh
Allow SSH from another device.
To allow ssh, you need to configure your router. In my case I am using the linksys velop network and the guide can be found here. I used single port forwarding and both external and internal port should be set to 22 which is the default port.
To figure out your Device IP address, just type this on your ubuntu Desktop:
1

Hostname -I
It should come out as 192.168.x.y and just populate this ip on your router settings. Afterwards, you should be able to ssh by doing this on your mac’s terminal:
1

ssh <username>@192.168.x.y -p 22
If you know your own ip address, it can also be done with ssh <username>@<your ip address> -p 22.
The following sections can now be done from your mac (or external machine)!
1
2
3
4
5
6
7
8
9
10
11
12
13
14
15
16
17
18
19
20
21
22
23

❯ ssh <myusername>@<my ip> -p 22
<myusername>@<my ip>'s password:
Welcome to Ubuntu 22.04.2 LTS (GNU/Linux 5.19.0-50-generic x86_64)

 * Documentation:  https://help.ubuntu.com
 * Management:     https://landscape.canonical.com
 * Support:        https://ubuntu.com/advantage

 * Introducing Expanded Security Maintenance for Applications.
   Receive updates to over 25,000 software packages with your
   Ubuntu Pro subscription. Free for personal use.

     https://ubuntu.com/pro

Expanded Security Maintenance for Applications is not enabled.

0 updates can be applied immediately.

Enable ESM Apps to receive additional future security updates.
See https://ubuntu.com/esm or run: sudo pro status

Last login: Sat Jul 29 16:57:03 2023 from 192.168.3.112
lowyx:~$
Configuring Python
I followed this guide to install anaconda, as it is my preferred method to manage different python environments locally. The instructions are pretty straight forward:
Using Docker while remote ssh!
- Turns out using docker in such an environment is pretty straight forward.
- It is exactly the same from the terminal point of view, and if you are using vscode, the plugins handles majority of the complexities.
- More information can be found at the remote ide section.
Look at the official anaconda repo site and select the version you need. I happen to be using the intel x64 architecture:
1
2

curl --output anaconda.sh https://repo.anaconda.com/archive/Anaconda3-2023.07-1-Linux-x86_64.sh
bash anaconda.sh
Then, reload your terminal (by exiting and ssh in again), you should be able to run conda:
1

conda env list
To create a new conda environment:
1
2

conda create -n pyt python=3.10
conda activate pyt
Configuring GPU for Pytorch
In my opinion, configuring Cuda and Nvidia for deep learning is a little tricky, I watched the following youtube video (below) but I found certain steps to be missing but it should give you a high level idea of the steps required:
- Install nvidia drivers (nvidia-smi)
- Configure Cuda
- Install pytorch
Nvidia-smi
First check if your desktop has a nvidia gpu and then install the driver:
1
2
3

lowyx:~$ lspci | grep -i nvidia
01:00.0 VGA compatible controller: NVIDIA Corporation Device 2684 (rev a1)
01:00.1 Audio device: NVIDIA Corporation Device 22ba (rev a1)
Then, check the available drivers avaliable:
1
2
3
4
5
6
7
8

lowyx:~$ ubuntu-drivers list
nvidia-driver-535-open, (kernel modules provided by linux-modules-nvidia-535-open-generic-hwe-22.04)
nvidia-driver-525-server, (kernel modules provided by linux-modules-nvidia-525-server-generic-hwe-22.04)
nvidia-driver-525-open, (kernel modules provided by linux-modules-nvidia-525-open-generic-hwe-22.04)
nvidia-driver-525, (kernel modules provided by linux-modules-nvidia-525-generic-hwe-22.04)
nvidia-driver-535, (kernel modules provided by linux-modules-nvidia-535-generic-hwe-22.04)
nvidia-driver-535-server, (kernel modules provided by linux-modules-nvidia-535-server-generic-hwe-22.04)
nvidia-driver-535-server-open, (kernel modules provided by linux-modules-nvidia-535-server-open-generic-hwe-22.04)
I installed the 525 version, do note that you need to reboot afterwards.
1
2

sudo apt-get install nvidia-driver-525
sudo reboot
Then, on the terminal run nvidia-smi and this should be the output:
1
2
3
4
5
6
7
8
9
10
11
12
13
14
15
16
17
18
19
20
21

+-----------------------------------------------------------------------------+
| NVIDIA-SMI 525.125.06   Driver Version: 525.125.06   CUDA Version: 12.0     |
|-------------------------------+----------------------+----------------------+
| GPU  Name        Persistence-M| Bus-Id        Disp.A | Volatile Uncorr. ECC |
| Fan  Temp  Perf  Pwr:Usage/Cap|         Memory-Usage | GPU-Util  Compute M. |
|                               |                      |               MIG M. |
|===============================+======================+======================|
|   0  NVIDIA GeForce ...  Off  | 00000000:01:00.0  On |                  Off |
|  0%   36C    P8    17W / 450W |    216MiB / 24564MiB |      0%      Default |
|                               |                      |                  N/A |
+-------------------------------+----------------------+----------------------+

+-----------------------------------------------------------------------------+
| Processes:                                                                  |
|  GPU   GI   CI        PID   Type   Process name                  GPU Memory |
|        ID   ID                                                   Usage      |
|=============================================================================|
|    0   N/A  N/A      1556      G   /usr/lib/xorg/Xorg                 64MiB |
|    0   N/A  N/A      1808      G   /usr/bin/gnome-shell              134MiB |
|    0   N/A  N/A      2165      G   ...bexec/gnome-initial-setup        6MiB |
+-----------------------------------------------------------------------------+
Cuda toolkit
If you see the nvidia-smi output above, you will notice that the CUDA Version is version 12. However, it is important for you to check the latest distribution of pytorch cuda version, for example in my case the stable build only supports up till 11.8.
So, it is important that we install the cuda 11.8 version. I just searched Google with nvidia driver for cuda 11.8 and it brought me to the nvidia developer page here.
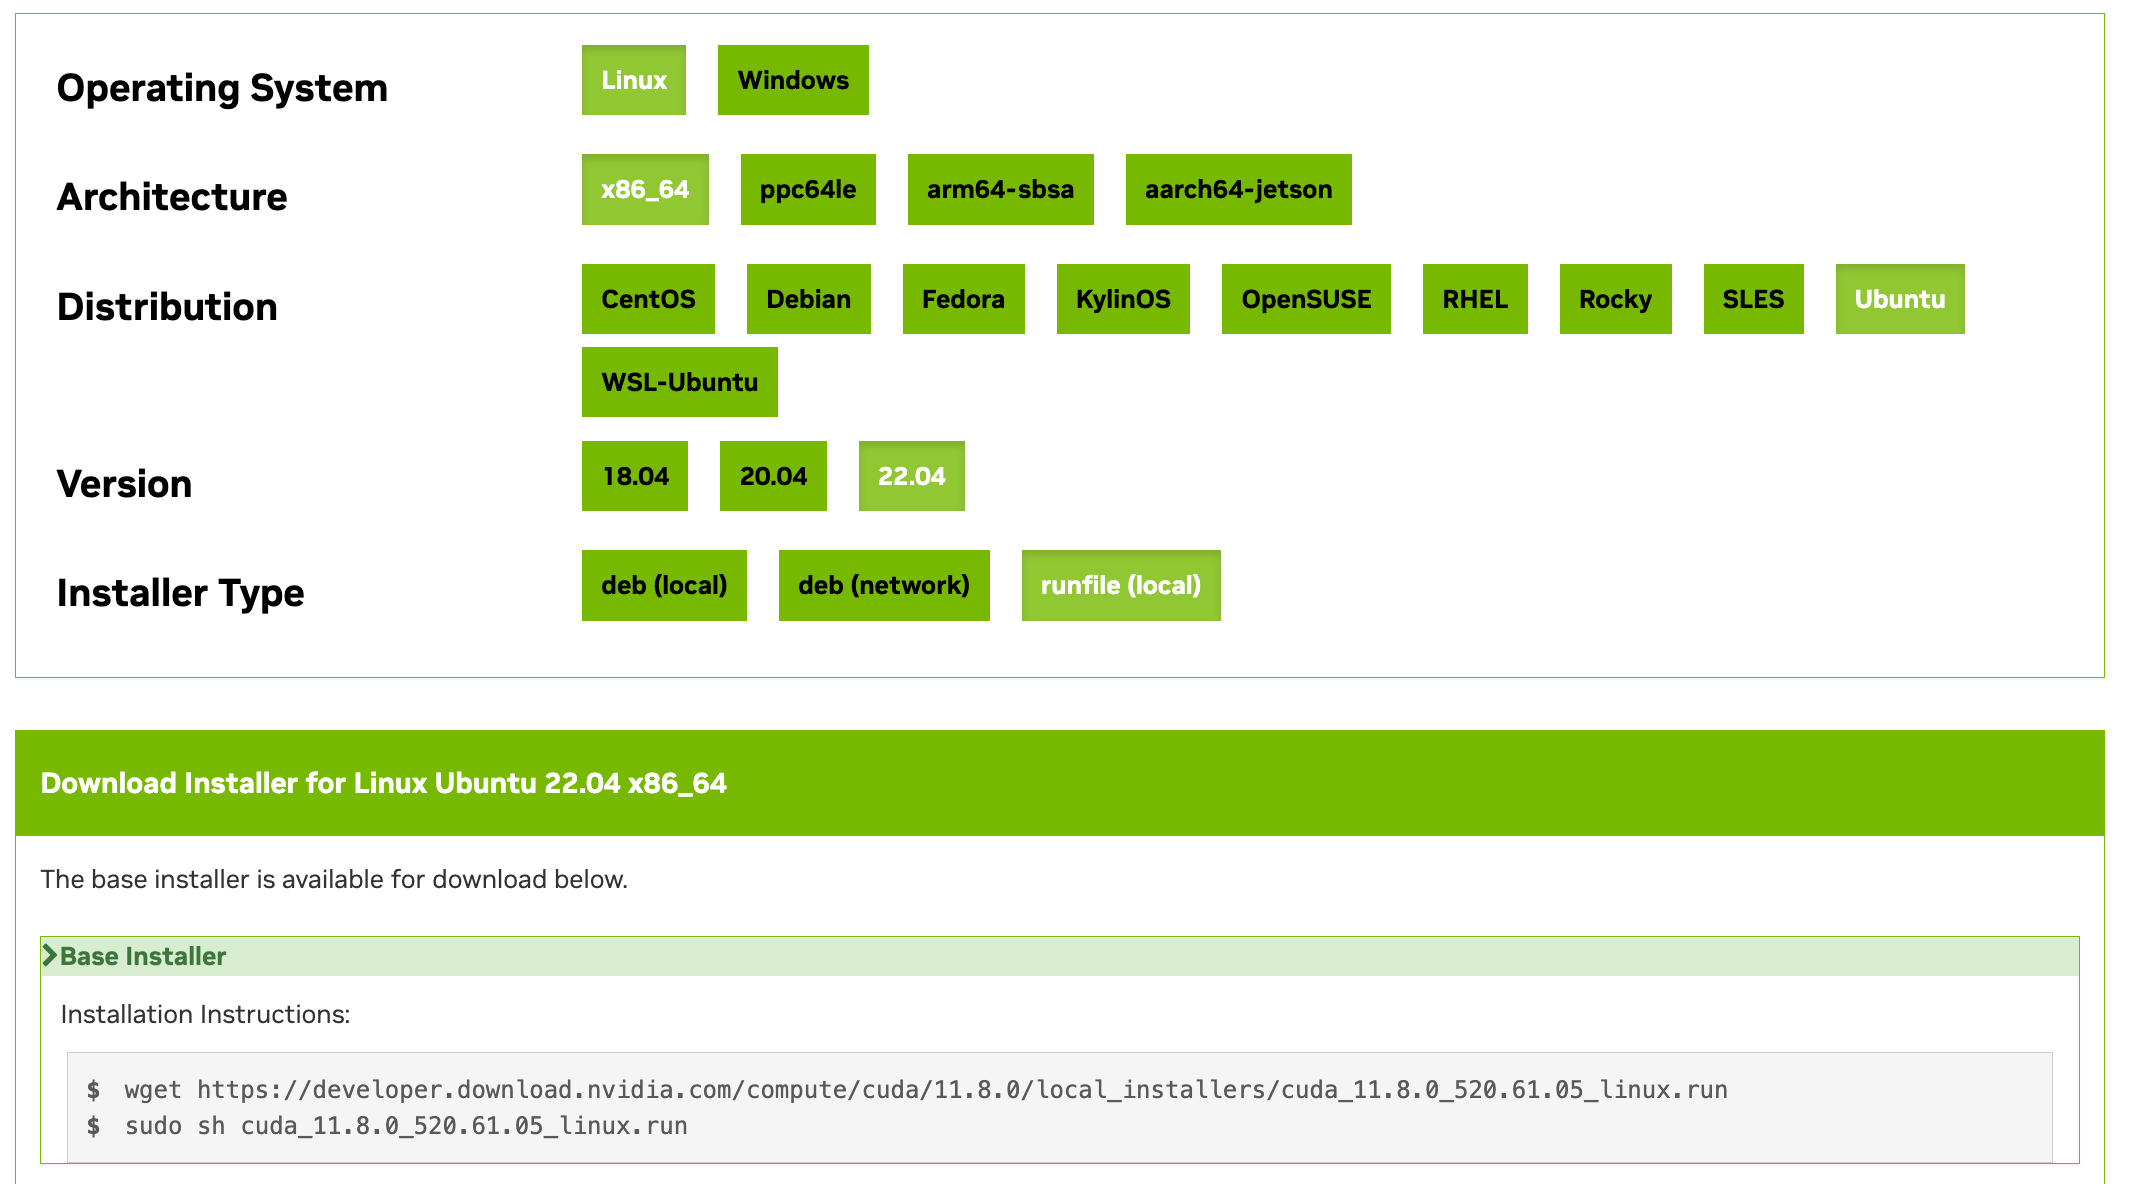
Select the required OS, architecture, distribution and version, runfile as installer type which will give you the instructions:
1
2

wget https://developer.download.nvidia.com/compute/cuda/11.8.0/local_installers/cuda_11.8.0_520.61.05_linux.run
sudo sh cuda_11.8.0_520.61.05_linux.run
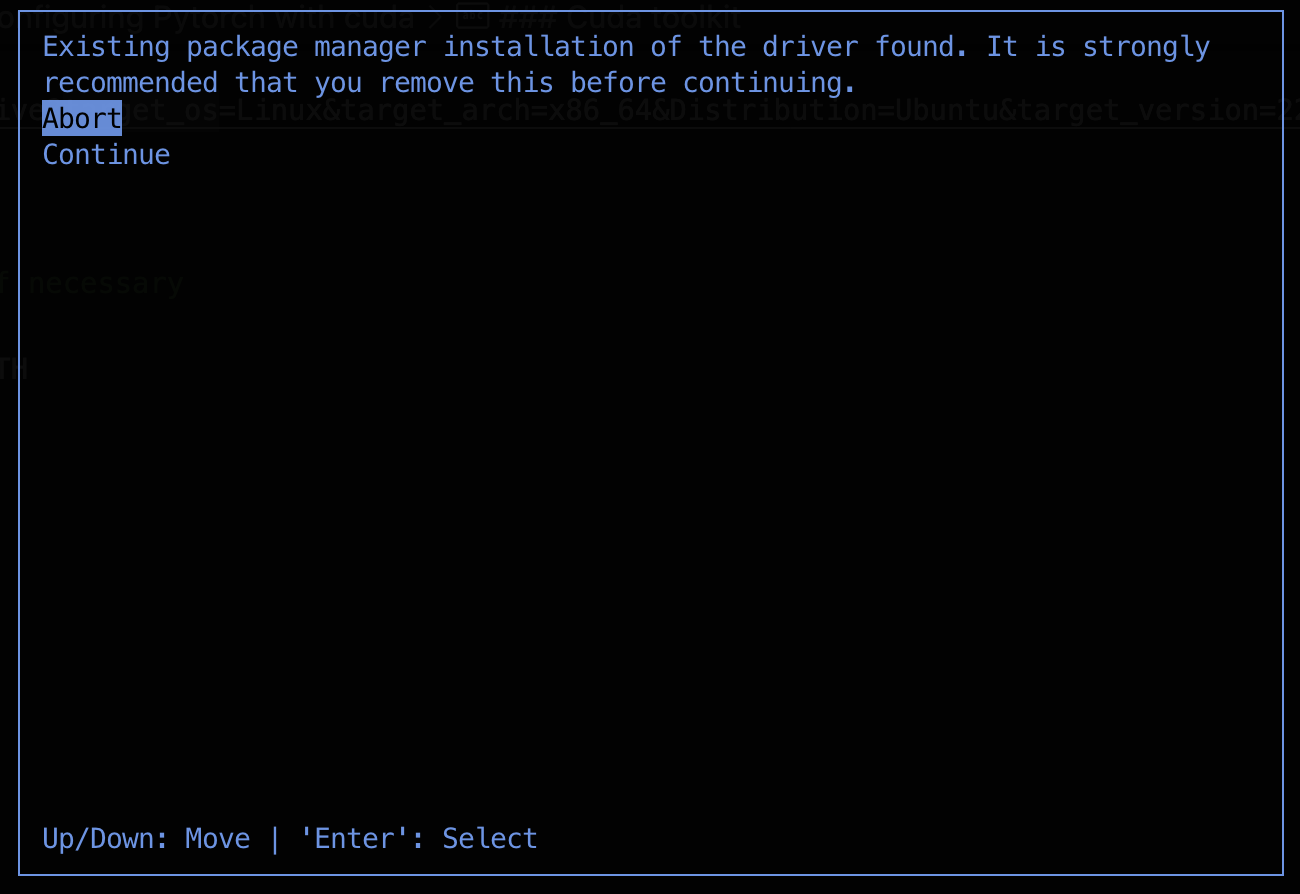
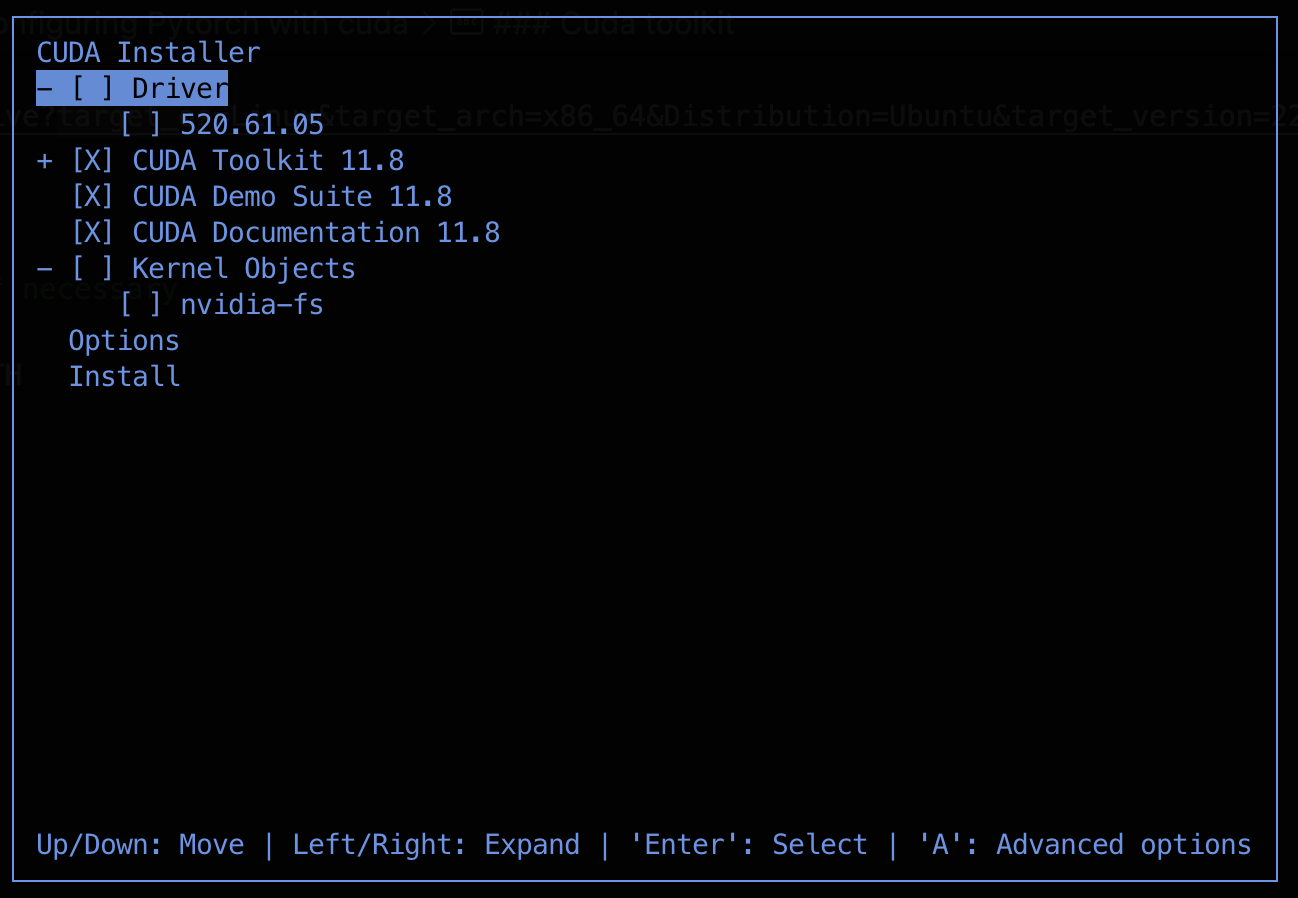
When you run the bash scripts, it warns you that you already have an earlier of driver installed, click Continue:
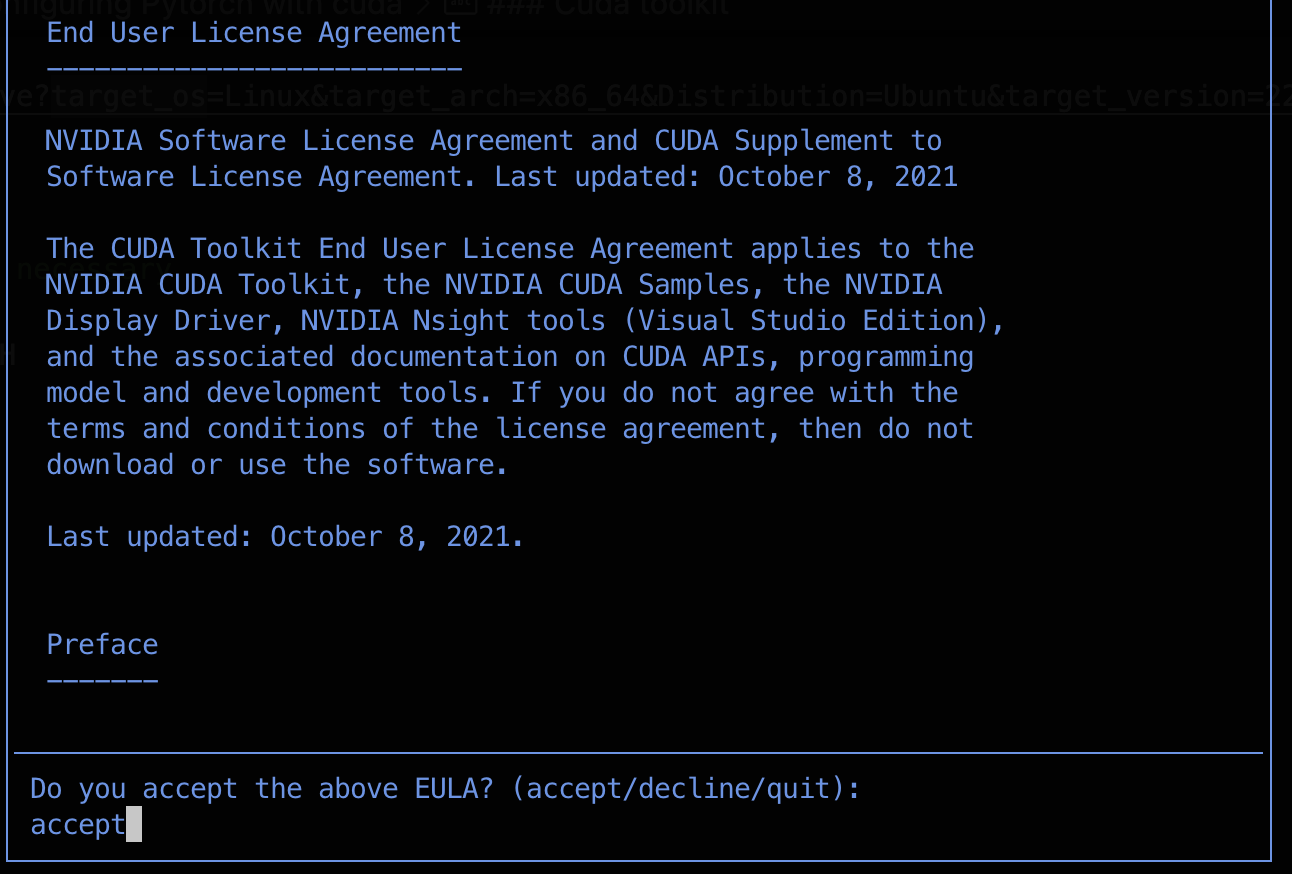
Accept the terms and conditions:
And unselect the driver installation:
After this step, reboot your desktop (sudo reboot). It will show you an output that your cuda has been added to /usr/local/cuda directory.
To make sure everything is working correctly:
- Navigate to
/usr/localand look forcuda-11.8(Or the version you are using): - Navigate to
cuda-11.8/bin, you should see anvccbinary
1
2
3
4
5
6

lowyx:/usr/local/cuda-11.8/bin$ ./nvcc --version
nvcc: NVIDIA (R) Cuda compiler driver
Copyright (c) 2005-2022 NVIDIA Corporation
Built on Wed_Sep_21_10:33:58_PDT_2022
Cuda compilation tools, release 11.8, V11.8.89
Build cuda_11.8.r11.8/compiler.31833905_0
Once this is verified, add this to your bashrc script:
1
2
3

export CUDA_HOME=/usr/local/cuda-11.8   # Modify the path if necessary
export PATH=$CUDA_HOME/bin:$PATH
export LD_LIBRARY_PATH=$CUDA_HOME/lib64:$LD_LIBRARY_PATH
Now, reboot your bash script/terminal and you should be able to run nvcc --version:
1
2
3
4
5
6

lowyx:~$ nvcc --version
nvcc: NVIDIA (R) Cuda compiler driver
Copyright (c) 2005-2022 NVIDIA Corporation
Built on Wed_Sep_21_10:33:58_PDT_2022
Cuda compilation tools, release 11.8, V11.8.89
Build cuda_11.8.r11.8/compiler.31833905_0
Pytorch
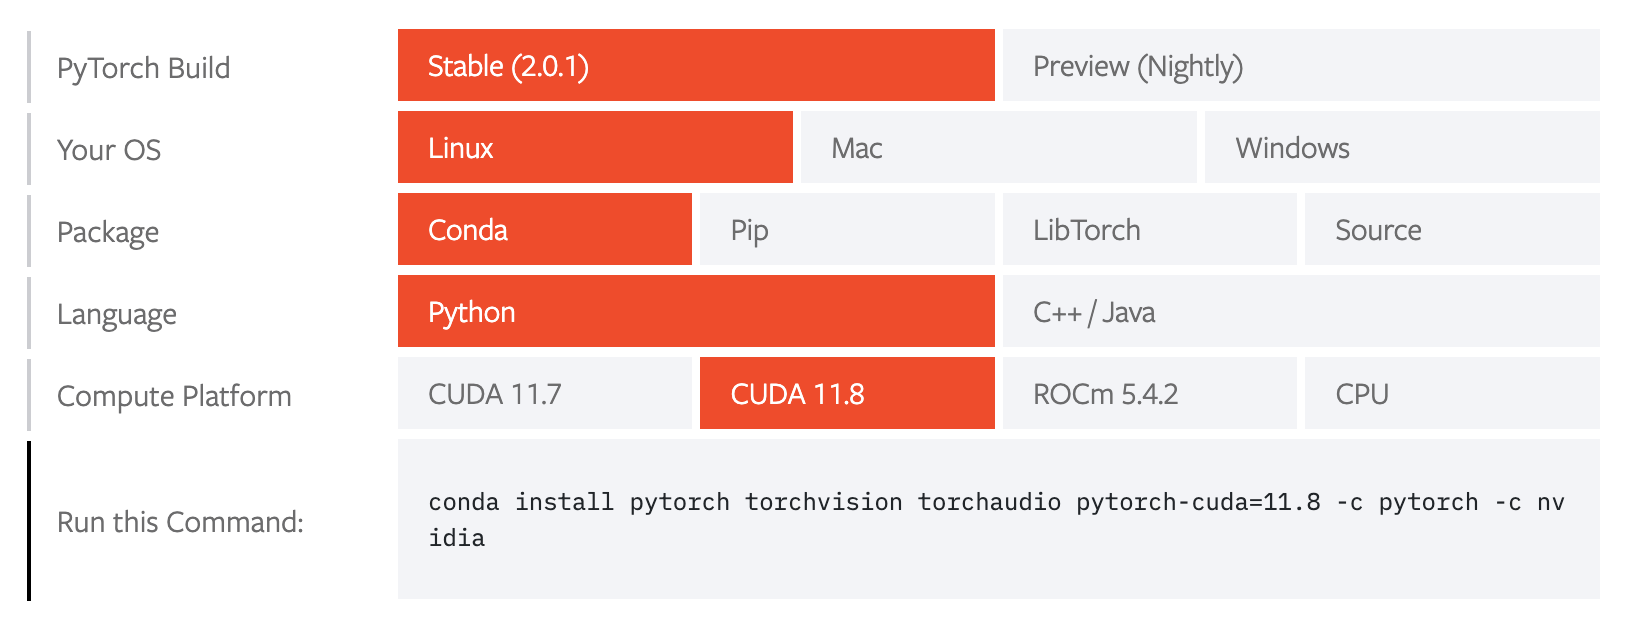
As mentioned, the pytorch installation instructions can be found in pytorch.org website. Since I am using linux with Conda, this are my installation steps provided:
1

conda install pytorch torchvision torchaudio pytorch-cuda=11.8 -c pytorch -c nvidia
To check if your pytorch is able to access the gpu, I found this stackoverflow to be a good guide:
1
2
3
4
5
6
7
8
9

lowyx:~$ ipython
Python 3.11.4 (main, Jul  5 2023, 13:45:01) [GCC 11.2.0]
Type 'copyright', 'credits' or 'license' for more information
IPython 8.12.0 -- An enhanced Interactive Python. Type '?' for help.

In [1]: import torch
torch
In [2]: torch.cuda.is_available()
Out[2]: True
Delete Driver + Cuda
During my process, I found myself running wrong steps and had to attempt to reinstall certain drivers. This stackoverflow provided me with the details required to remove cuda from ubuntu.
1
2
3
4

sudo apt-get purge nvidia*
sudo apt-get autoremove
sudo apt-get autoclean
sudo rm -rf /usr/local/cuda*
Tensorflow
Installing tensorflow is pretty easy, I just followed the official documentation. As compared against the other tutorials I have found online, I was not required to install cuDNN. (It seems like I also do not need to do so for pytorch, perhaps if anyone is reading this and knows why, please let me know)
Remote IDE
Use vscode remote development. All you got to do is to connect to ssh and vscode will figure out your filesystem for you.
Remote IDE with docker
I followed this tutorial to install docker.
Similarly, you can create a Dockerfile and .devcontainer.json, install the required extensions and develop on top of docker in your remote Desktop. I may upload an example in the future if there is demand for it.
Useful Tips
Check remaining space:
1

df -h
Check size of current directory:
1

du -sh
Check size of each folder in current directory:
1

du -sh ./*
To list all available drives:
1

lsblk
To have a shared drive and share them among dual boot, I found this guide to be useful.
For my own linux, I created /mnt/shared and added this line to /etc/fstab:
1

/dev/sda2 /mnt/shared ntfs-3g defaults,auto,umask=000 0 0